Why 3D Wire Bond inspection is better than 2D inspection
What is Wire Bond Inspection
Wire bond inspection is generally a quality control to check and determine the wire bond quality of an electronic component. There is 2D wire bond inspection and 3D wire bond inspection. In 2D wire bond inspection, the image of the wire bond is captured from a single, top-down perspective before being analysed to detect defects, anomalies, or irregularities in the wire bond. 2D wire bond inspection is commonly known as the conventional or traditional inspection method.
3D wire bond inspection is a more complicated and advanced inspection method than 2D wire bond inspection. It involves carefully inspecting the wire bonds that connect the integrated circuits (ICs) to the substrate or other components in three dimensions using specialized equipment and depth perception technologies. This enables a more accurate and thorough evaluation of the wire bonds.
The specialized equipment includes high-resolution 3D microscopes, confocal microscopy, and scanning electron microscopy (SEM) advanced imaging technologies, robotic stages, laser profilers, ultrasound examiners, acoustic microscopes, X-ray inspection, infrared (IR) imaging, and complicated image processing data analysis tools or software.
Advantages of 3D Wire Bond Inspection:
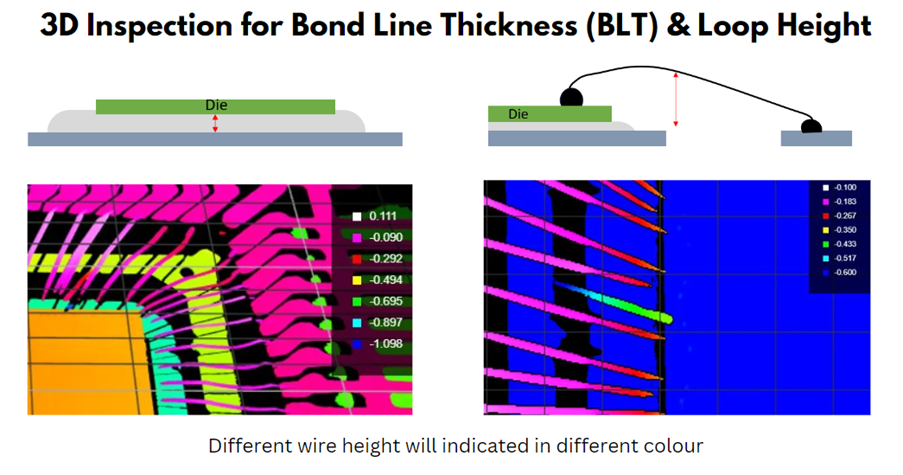
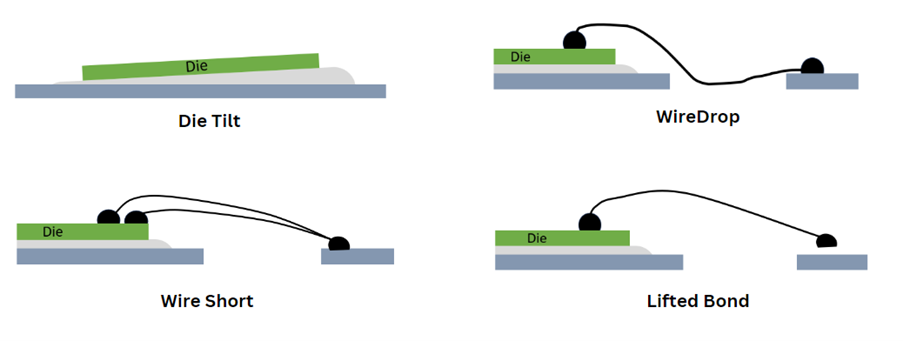
3D inspection captures images with greater depth from multiple perspectives, while 2D inspection captures images from a single top-down perspective. This depth perception makes it possible to assess the wire loop height and thickness of the wire bond, as well as deviations in determining the quality and integrity of the bond. It is also useful for detecting defects such as wire drop, wire short circuit and lifted bond on complex wire bond that are difficult to detect with 2D inspection. 2D inspection lacks this depth information, resulting in a less accurate and reliable evaluation of the wire bond.


In addition, 3D wire bond inspection provides greater measurement accuracy for bond dimensions, angles, and other critical parameters. 3D wire bond inspection has also resulted in higher production yields because defects can be detected early in the manufacturing process, increasing yields, reducing scrap, and lowering costs. Manufacturers can identify areas for improvement and make the necessary adjustments based on the information gained from the 3D inspection data.
This proactive approach to process optimization results in higher-quality products and more efficient manufacturing processes. The reliability, longevity, and performance of electronic components are significantly improved. Premature failures can be prevented.
In addition, manufacturers can optimize the data obtained from inspection to improve their wire bonding process, resulting in product consistency and product quality. This avoids variations in inspection quality that can occur with 2D inspections by human inspectors. Each product is subjected to the same rigorous evaluation with consistent quality control during 3D inspection.
Generally, those 3D defects include die tilt, wire drop, wire short circuit and lifted bond. Each can have catastrophic effect to the assembly process
The main advantages of 3D inspection are that it is non-destructive, testing the quality of wire bonds without damaging the components, which is suitable for industries where the components must still be usable after inspection. Besides, those 3D inspection is also to inspect BLT (Bond Line Thickness) and wire loop height. This multiple method ensures that the product remains intact and functional after inspection.
The 3D inspection systems also provide more comprehensive records and better traceability, which is essential for quality control and regulatory compliance. Manufacturers can track defects, analyze trends, and take appropriate corrective action. This traceability improves accountability and compliance with industry standards and regulations and indirectly improves the manufacturer’s reputation.
In summary, 3D wire bond inspection is indeed a powerful quality control tool compared to 2D inspection. It improves detection, depth perception, measurement accuracy, yield, process optimization, non-destructive testing, and improved productivity. 3D wire bond inspection is the pinnacle of quality assurance, ensuring the delivery of reliable, high-quality products to consumers and industries around the world.
Contact us for holistic solution, integrated problem solving. We are here to find a customized resolution for your hiccup. Find us : www.cortexrobotics.my
We are ready for you 24 x 7.

